Many people feel their computer is getting slow and start thinking about buying a new one. But in a lot of cases, the problem is not the whole computer. The real issue is the storage drive. If your system still uses a traditional hard drive, changing it to an SSD can make a very big difference. Boot time gets shorter, apps open faster, and the whole system feels more responsive. That is why learning how to install ssd is worth your time, even if you are not a technical person.
An SSD is a solid-state drive. It stores data like a normal drive, but it works much faster because it has no moving parts. That simple difference changes the way a computer feels in daily use. You do not need to be an expert to understand the upgrade. You only need the right drive, a little patience, and a clear step-by-step method. In this guide, I will explain how to install ssd in a way that is easy to follow and actually useful when you sit down to do it.
Why SSD Upgrade Really Matters
A lot of users expect better performance from random software settings, but storage is often the real reason behind a slow machine. When a computer has an old hard drive, it takes more time to read and write files. That delay adds up every time you open the system, launch a browser, or move between folders. An SSD removes much of that waiting. The change is not only visible, it is also easy to feel.
This upgrade is especially helpful for older systems. A laptop that feels tired and slow can become much more usable after an SSD swap. A desktop can go from frustrating to smooth without changing anything else. That is why many people search for how to install ssd in pc when they want a quick and cost-friendly upgrade instead of replacing the whole system.
Another good thing is that SSDs are silent and more durable than hard drives because they do not rely on spinning parts. They also use less power, which is useful for laptops. So this isn’t only about speed—it’s about improving overall performance and making your computer smoother to use every day. It is also about making the computer easier to live with every day.
Before You Start
Before you touch any screws, take a few minutes to check what kind of drive your system supports. This part matters because not every SSD fits every computer. Some systems support a 2.5-inch SATA SSD. Others support M.2 SSDs. A few modern systems use NVMe drives through M.2 slots. If you buy the wrong type, the drive will not fit, and that creates unnecessary trouble.
It also helps to check whether you want to replace the old drive or keep it as extra storage. Many desktop users install the SSD as the main drive for Windows and use the old hard drive for videos, downloads, and backups. That setup works well because the SSD handles speed and the old drive handles large storage. On a laptop, though, the space may be limited, so the upgrade can be a simple replacement.
Installing SSD in a Desktop PC
A desktop is usually the easiest place to start because there is more room inside the case. First, turn off the PC completely and unplug the power cable. After that, press the power button once so any leftover electricity is released. Then remove the side panel of the case. Once the case is open, keep the screws in a safe place so nothing gets lost.
Now find the storage area. If you are installing a 2.5-inch SATA SSD, place it into the drive bay or mount it using the bracket that comes with the case. After the drive is secure, connect the SATA data cable from the SSD to the motherboard and connect the SATA power cable from the power supply. Both cables should fit firmly. If one is loose, the computer may not detect the drive.
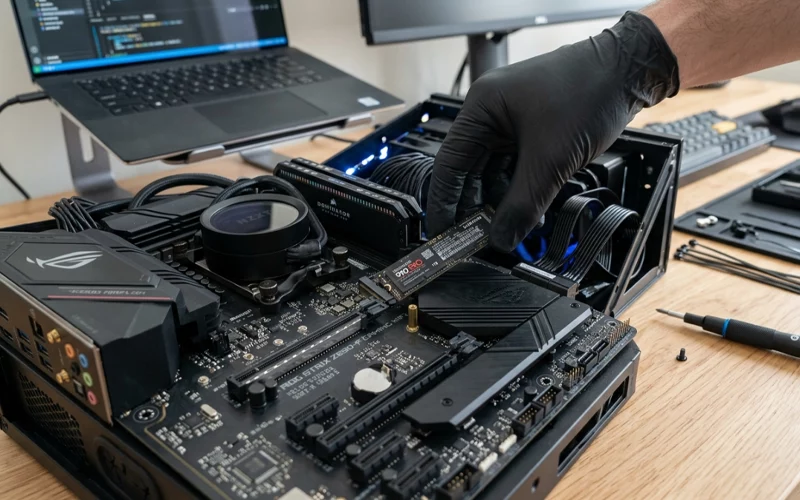
If your drive is an M.2 SSD, the process is different but still simple. Find the M.2 slot on the motherboard, insert the SSD at a slight angle, and gently press it down. Then secure it with the tiny screw. Do not force it. The drive should go in smoothly. A lot of first-time users worry about damaging something, but if you go slowly, it is usually straightforward.
After the drive is installed, close the case and reconnect the power cable. When you turn the PC back on, enter BIOS or UEFI if needed and check whether the SSD appears there. If it does, the hardware side is fine. From there, you can install Windows, clone your old system, or set the SSD as the boot drive. That is the practical side of how to install ssd in pc, and once you do it once, it feels much easier the next time.
Installing SSD in a Laptop
Laptop installation needs a little more care because the space inside is tighter and the parts are more delicate. Start by shutting the laptop down fully. Make sure the laptop is fully shut down instead of just sleep mode. Remove the charger, and if the battery can be taken out, disconnect it as well. If the battery is built in, you may need to disconnect it after opening the back panel.
Flip the laptop over and remove the screws from the bottom cover. Keep them in order if possible, because some laptops use different screw sizes. After removing the back panel, look for the storage drive. If the laptop uses a 2.5-inch SATA drive, it will usually be held in a bracket. Remove the old drive carefully and place the SSD in the same spot. Reconnect everything the same way it was before.
If the laptop supports an M.2 SSD, locate the small M.2 slot on the motherboard. Slide the SSD into the slot at an angle, then press it down gently and secure it with the small screw. This part is easy once you see it, but it should never be rushed. If something does not fit, stop and check the orientation instead of pushing harder.
When everything is back in place, close the laptop and power it on. If the SSD is new and empty, the laptop will not boot into Windows until the operating system is installed. That is normal. Many people search how to install ssd in laptop because they want the machine to feel faster without buying a new device. In most cases, this one upgrade gives a huge improvement.
After the SSD Is Installed
Once the SSD is inside the system, the next step is setting it up properly. If the drive is brand new, you might have to install Windows using a bootable USB drive. During setup, choose the new SSD as the destination drive. If you cloned your previous drive, your system should boot from the SSD normally, but with noticeably faster performance.
Sometimes the system does not boot from the new drive right away. That usually means the boot order needs to be changed in BIOS. Go into the BIOS settings and make sure the SSD is placed at the top of the boot list. If the old hard drive is still connected, the computer may try to boot from that first unless you change the order manually.
After the system starts properly, check that your files, programs, and settings are working. Open a few apps and notice the speed difference. Most people see the biggest change when the system starts up and when programs load. That is one of the main reasons people look up how to install ssd in the first place. The result is usually immediate and easy to notice.
If you kept the old drive inside the computer, you can use it later as extra storage. That is a smart way to make use of older hardware. It also helps keep the SSD free for the operating system and important applications, which can improve performance over time.
Cloning or Fresh Installation
After people learn the hardware part, they usually get stuck on this question: should they clone the old drive or start fresh? Both options are fine. Which option works best actually depends on your specific needs and setup.
Cloning is the easier option if you want your computer to look and work the same as before. Your files, programs, and Windows settings move to the new SSD, so you do not have to reinstall everything. This saves time and is useful for people who already have a setup they like. It is also a good choice when you are switching storage but do not want to change your workflow.
A fresh installation is better when your old system is already cluttered or slow because of years of old files and software. Starting fresh can make the computer feel cleaner and more organized. The downside is that you must reinstall programs and move your files back later. Some users like this because it gives them a clean beginning. Others do not want the extra work.
There is no wrong answer here. What matters is choosing the method that fits your comfort level. The SSD itself is what gives you the speed. The installation method only affects how your data moves over. Once you understand that, how to install ssd becomes less confusing and more practical.
Small Mistakes That Can Cause Trouble
A lot of installation problems happen because of small mistakes, not because the process is difficult. One common mistake is buying the wrong type of SSD. Another is forgetting to check whether the motherboard or laptop supports the drive. These may sound like basic things, but they are the most common reasons people get stuck.
Another problem is loose cables. On desktop systems, both the SATA data cable and power cable must be connected properly. If the SSD is not detected, the first thing to check is usually the cable connection. People also sometimes leave the boot order unchanged, so the computer keeps starting from the old drive even after the SSD is installed.
There is also the mistake of rushing. The inside of a computer can look more complicated than it really is, and that makes people nervous. But this is one job where slow and careful is better than fast and careless. If you read each step properly and check the fit before closing the case, you reduce the chance of problems a lot.
How to Keep the SSD Working Well
You should also back up important files regularly. SSDs are reliable, but no storage device is perfect. A backup gives you peace of mind if anything goes wrong later. It is also a good habit for all computer users, not just people who install new hardware.
Windows usually manages SSD health automatically, so there is not much special maintenance needed. Still, system updates and firmware updates can help keep things running properly. The best thing about an SSD is that after the installation, it mostly takes care of itself.
FAQs
How is an SSD different from a traditional hard drive?
A hard drive uses mechanical spinning disks, while an SSD uses flash memory. This makes SSDs much faster and more reliable.
Will my computer performance improve after upgrading?
Yes, you will notice faster boot time, quick app opening, and smoother overall performance.
Can every laptop or PC support an SSD upgrade?
Not all systems support every type. You need to check if your device has SATA or M.2 support before buying.
Is it necessary to reinstall Windows after upgrading to an SSD?
You can either reinstall Windows or clone your existing system. A fresh install usually gives better performance.
Is installing an SSD difficult for beginners?
No, it is a simple process if you follow proper steps. Desktop PCs are easier, while laptops need more care.
What should I do before upgrading my storage?
Always back up your important files to avoid any data loss during the process.
Why is the new drive not showing in my system?
This can happen due to loose cables or BIOS settings. Checking connections and boot settings usually fixes it.
How long does an SSD usually last?
It can last many years with normal use if you keep enough free space and avoid unnecessary heavy writes.
Final Words
Upgrading to an SSD is one of the most useful things you can do for a slow computer. It is simple, affordable, and the results are easy to notice. Whether you are working on a desktop or a laptop, the process is manageable if you follow the steps carefully and do not rush. Once you understand how to install ssd, the whole task feels much less intimidating.
If your goal is to make the computer faster without replacing the entire machine, this is a great place to start. The upgrade can give new life to an older system, improve daily use, and make everything feel smoother. For many people, that one change is enough to make the computer enjoyable again.
Knowing how to install ssd in pc or how to install ssd in laptop is not just a technical skill. It is a practical way to improve the device you already own. And in many cases, that is the smartest upgrade you can make.
If you want to read more interesting and detailed guides, visit EmbossitWorld now. You’ll find useful Information, and a lot of practical information. Don’t miss out.


Add comment