Formatting a USB drive is one of the simplest computer tasks, yet many people still get confused because every device and operating system handles the process differently. Whether your USB drive has become slow, corrupted, full of unwanted files, or you simply want to prepare it for a new use, learning how to format a USB drive properly is important. A correctly formatted USB ensures faster performance, compatibility with multiple devices, and better storage health.
What Drive Formatting Actually Does
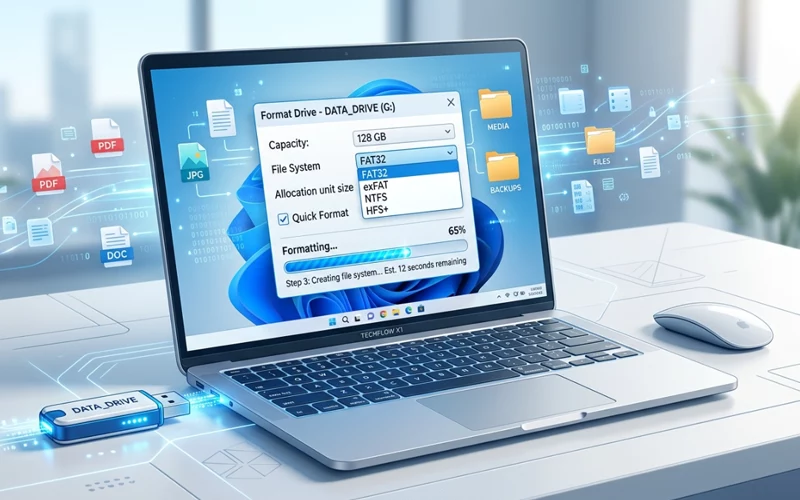
When you format a USB drive, you are preparing it for use by erasing the stored data and building a fresh file system. A file system is simply the method your computer uses to store and organize your files. For example, Windows commonly uses NTFS and FAT32, macOS uses APFS or HFS+, and cross-platform drives often rely on exFAT.
Formatting deletes all existing data, but it also cleans up hidden errors, resets the drive’s structure, removes viruses from USB infections, and restores performance. Many users think erasing is dangerous, but it is actually one of the most effective maintenance steps to keep your storage working smoothly.
Picking the Right File System
Different file systems serve different purposes. Before learning to set up a USB drive, it is important to understand which file system suits your device or usage.
FAT32 works on almost all devices, including TVs, game consoles, media players, and older computers. It is widely compatible but cannot store single files larger than 4GB.
exFAT is the modern choice because it handles large files and still works on Windows, macOS, Linux, and many devices. It is ideal for transferring videos, software packages, and backups.
NTFS is great for Windows-only usage. It supports permissions, encryption, and large file sizes but is not ideal for cross-platform use.
HFS+ and APFS are Apple-specific file systems mainly used by macOS, so they are not recommended for USB drives unless you use the USB exclusively on a Mac.
Once you know what file system you want, the formatting becomes straightforward.
Windows USB Setup Overview
Windows makes initializing easy through File Explorer or Disk Management. You insert your USB, wait for the system to detect it, then right-click and format. But because users have different versions of Windows such as 10 and 11, and different problems like drive not showing or being write-protected, each case needs a dedicated explanation. The upcoming sections explain these scenarios one by one.
Windows 10 Guide for Storage Devices
Many users still use Windows 10, and the interface is user-friendly. To understand how to format a usb drive on windows 10, you simply plug in your drive, open File Explorer, find the USB under “This PC,” right-click it, and select “Format.” Once the window opens, you choose the required file system and click Start.
Windows 10 handles erasing smoothly, but selecting the right file system is essential. If you want to use the USB across multiple devices, choosing exFAT is wise. If the drive will remain inside a Windows ecosystem, NTFS is reliable. The process usually takes a few seconds unless the drive is damaged or has corrupted sectors, in which case it may take longer.
Setting Up Storage on Windows 11
The user interface of Windows 11 is modernized, but the formatting process is nearly identical to Windows 10. To understand how to format a usb drive on windows 11, after inserting the USB, you open File Explorer and locate the device in the sidebar. Right-clicking the USB shows the Format option, and the system allows you to pick from NTFS, FAT32, or exFAT.
Windows 11 also includes improved disk repair tools. If the USB takes too long to initialize, you can run a quick scan through its built-in error-checking feature before trying again. Many people prefer initializing with the “Quick Format” option checked because it saves time, but full initialization is better when the drive has performance issues.
Using CMD for Disk Management
Some users feel comfortable using the Command Prompt because it offers better control. Learning how to format a USB drive using CMD is useful when the graphical interface fails or the USB becomes stubborn due to hidden file system corruption.
First, you open CMD with administrator privileges. Then you run “diskpart,” list all available disks, select your USB drive carefully, clean it, create a partition, and assign a new file system. The process looks technical, but it is powerful and effective. Many technicians prefer CMD when a USB refuses to format through normal methods.
Fixing Write-Protected Storage Devices
Write protection stops you from making changes to files, including deleting or editing the stored data. Sometimes the write protection is caused by a switch on the USB body, but often it results from corrupted registry entries, malware infections, or accidental system settings.
If your drive shows a “write protected” error, understanding how to format a USB drive that is write protected becomes essential. Removing write protection may involve running registry edits, using diskpart commands, or repairing the drive from another computer. Once the protection is removed, the USB formats normally. However, if the protection is due to hardware failure, then replacing the USB becomes the only solution.
When External Storage Doesn’t Appear
Sometimes, a USB may not appear in File Explorer even though it is physically connected. This issue usually happens because the drive has no assigned letter, or the file system is completely damaged. Knowing how to format a USB drive that doesn’t show up requires checking Disk Management. If the USB appears there without a letter, assigning one makes it visible immediately. If the drive shows as unallocated, creating a new partition is necessary before formatting. In very rare situations, the motherboard or ports cause detection issues, but such cases require more advanced troubleshooting.
Convert to FAT32 File System
Many TVs, gaming consoles, and older systems require FAT32. Users often search for how to format a USB drive to FAT32 because newer Windows versions hide this option for larger drives. FAT32 is simple and highly compatible but has the known 4GB file limit.
If Windows does not show FAT32, you may need to use a dedicated tool or convert it through CMD using diskpart. macOS and Linux allow FAT32 setup for large drives without restrictions, making them useful alternatives if Windows becomes difficult.
Converting to exFAT
For people working with large media files, exFAT is the best option. Learning how to format a USB drive to exfat is helpful because exFAT removes the annoying file size limitations found in FAT32. It is widely supported by Windows, macOS, Linux (with plugins), gaming consoles, and smart devices.
Formatting to exFAT is extremely easy, and both Windows and macOS provide this option by default. exFAT is the perfect choice for video editors, photographers, and users who frequently transfer big projects between multiple systems.
Restoring Full Capacity
Sometimes after partitioning or using a USB as a bootable installer, the drive appears smaller than its actual storage. To fix this, you need to know how to format a USB drive back to full capacity. The solution usually involves deleting all existing partitions through Disk Management or CMD’s diskpart tool, and then creating a single fresh partition that uses 100% of the space. Only after that will Windows let you reformat the USB drive back to its original full capacity.
Mac Instructions for External Devices
Apple users often need guidance on how to format a usb drive on mac because macOS handles file systems differently than Windows. The process requires opening Disk Utility, selecting the USB, choosing Erase, and picking a file system such as exFAT, APFS, or FAT32.
For users who want compatibility with Windows or smart devices, exFAT is the perfect choice. Those who want Apple-only usage can select APFS. Once you confirm, macOS erases and formats the drive cleanly. Disk Utility also offers a secure erase option that removes data more permanently by writing over the drive multiple times.
Setup Guide for Linux Systems
Linux users often interact with different file systems, so knowing how to format a usb drive in linux is extremely helpful. Most Linux distributions allow formatting through graphical tools like GParted or Disks. But many users prefer Terminal commands due to their speed and control. Linux can format a USB into FAT32, exFAT, NTFS, ext4, and other file systems with a single command. It is particularly strong for repairing corrupted drives that other operating systems struggle with.
Chromebook Instructions
Chromebooks use ChromeOS, which offers a simple and clean interface for storage tasks. Understanding how to format a usb drive on chromebook is important for students, office users, and cloud-based workers. After inserting the USB, you open the Files app, right-click the drive in the sidebar, and select “Format Device.” Chromebook supports FAT32 and exFAT, making it suitable for most general uses. The formatting is fast because ChromeOS uses lightweight disk handling.
Best File Systems by Use Case
Below is a simple reference table placed mid-article to help you choose the right format based on your needs.
Purpose / Use Case | Recommended File System | Why It’s Ideal |
Compatibility with all devices | FAT32 | Works on TVs, consoles, old PCs, media players |
Large files (over 4GB) | exFAT | No file size limits, works on Windows, macOS, Linux |
Windows-only usage | NTFS | Supports permissions, encryption, stability |
macOS-only usage | APFS / HFS+ | Optimized for Apple systems |
| Bootable USB creation | FAT32 or NTFS | Depends on OS installer requirements |
Understanding Quick Format vs Full Format
When learning how to initialize a USB drive, it’s important to know the difference between quick and full initialization. Quick initialization erases the file system without scanning the drive for errors. This makes it fast but not thorough. Full initialization checks every sector and marks the bad ones, ensuring long-term performance. If your USB has been used heavily or begins to slow down, performing a full initialization can restore its speed and reliability.
Common Errors & Fixes
Formatting does not always go smoothly. Sometimes a USB might freeze during the process, show an unsupported file system, or return an error message. These issues usually arise from corrupted partitions, malware infections, or hardware failure.
If your system keeps rejecting the format request, restarting the computer often helps. Trying another USB port or another computer can also solve detection issues. In severe cases, removing all partitions through diskpart or disk repair tools becomes necessary.
Keeping Your Drive Healthy
Formatting a USB drive is just the first step. After that, you must handle the drive carefully to avoid corruption. Removing the USB safely prevents damage to the file system. Avoid filling the USB to its maximum capacity because that slows down performance. Avoiding physical damage and high temperatures helps extend the USB drive’s lifespan and keeps it working properly for a longer time.
Another important habit is scanning the USB regularly for viruses, especially if you use it across multiple computers. Many people lose important data because of autorun viruses that spread through infected drives, but a simple antivirus scan prevents such problems.
When You Should Not Format a USB Drive
There are moments when formatting is not the right choice. For example, if you have important data stored and no backup, formatting will erase everything permanently. In such cases, you should perform data recovery first using specialized tools or services.
Another situation where initializing should be avoided is when the USB begins showing signs of hardware failure, such as overheating or making clicking sounds. Repeated initialization will not repair a physically damaged USB, and continued use risks further data loss. It is better to replace the drive immediately.
FAQs
What does preparing a storage drive actually do?
Preparing a storage drive removes all existing data and sets up a fresh file system. It helps fix errors, improves performance, and makes the device work more smoothly.
How to format a USB drive safely without losing important data?
Before you perform USB formatting, always back up your important files because the process deletes everything permanently. After saving your data elsewhere, you can safely continue with the process.
Which file system is best for everyday use?
For general use across multiple devices, exFAT is usually the best option. It supports large files and works on most modern systems without compatibility issues.
Why is my storage device not showing on my computer?
A storage device may not appear due to driver issues, missing drive letters, or file system corruption. Checking disk management or using another port often fixes the issue.
How can I fix a write-protected device?
Write protection can sometimes be removed using system tools or command settings. If the issue is caused by hardware damage, the device may no longer be usable.
What is the difference between quick and full process?
Quick process only removes file references, while full process scans for errors and bad sectors. Full method takes longer but is more reliable for long-term use.
Can I use the same storage device on Windows and Mac?
Yes, you can use it on both systems by choosing a compatible file system like exFAT. This allows smooth file transfer between different operating systems.
How do I restore full storage capacity if it shows less space?
If your device shows reduced space, deleting all partitions and creating a new one usually restores full capacity. This often happens after using bootable tools or multiple partitions.
Is it possible to use Command Prompt for formatting?
Yes, Command Prompt can be used using disk management commands. This method is helpful when the normal option is not working properly.
How often should a storage device be refreshed?
When the device becomes slow, corrupted, or you plan to reuse it for a new purpose, you should refresh it. Avoid refreshing it unnecessarily.
Final Thoughts
Learning how to format a USB drive correctly makes your workflow smoother and prevents storage issues. Whether you use Windows, macOS, Linux, Chromebook, or even CMD tools, formatting remains one of the simplest yet most powerful ways to reset and maintain your USB. Each operating system has its own way of handling storage devices, but the basic principles are the same: choose the right file system, prepare the drive, and format accordingly.
By understanding how to handle situations like write protection, missing drives, corrupted partitions, and capacity loss, you can solve many USB problems on your own. A well-formatted USB lasts longer, performs better, and becomes a reliable companion for your personal or professional tasks.
If you follow the instructions explained in each section, you will always be able to format your USB safely, efficiently, and correctly—regardless of the device or system you are using.
If you want to read more interesting and detailed guides, visit EmbossitWorld now. You’ll find useful Information, and a lot of practical information. Don’t miss out.


Add comment