So, What Exactly Is Website Development?
Website development means creating a website from the ground up. It’s the process of turning ideas into something real that people can visit and use on the internet like blogs, online stores, or even a digital clock. Everything you see and interact with on a website was once just lines of code written by someone. In this guide, you’ll learn how to build a website from scratch, using simple tools and clear steps, even if you’re just getting started.
This process usually has two parts:
- The front-end, which is everything users see and interact with
- The back-end, which runs behind the scenes and manages data
What Is the Front-End and Why It Matters
Whenever you visit a website, the part you see like the buttons you click, the menus you scroll through, or the text you read is called the front-end. It’s the visible face of a website that shapes your first impression. If a site looks clean and works smoothly, it’s because the front-end was built with care.
To create a front-end, we use three basic tools:
- HTMLlays out the structure,
- CSSadds style and design,
- JavaScriptmakes the page interactive like showing live time or responding to what you type.
Learning How to Build a Website from Scratch might sound like a big task, but it’s easier than you think when someone walks you through it. In this guide, we’ll show you everything from your first line of code to putting your finished site on the web. It’s simple, it’s hands-on, and it’s made just for beginners.
How to Build a Website from Scratch Start with a Simple Idea
In this tutorial, we’ll be building a simple yet smart World Clock that shows you the current time, day, and date for different countries. It works by letting users search by country name, and instantly displays the local time with useful details.
Here’s what it will do:
- Let the user type in a country name
- Show the local time, day, and full date based on that country’s timezone
- Add smooth animations and light background color changes for each country
- Handle errors when a country isn’t found
Unlike many tutorials that use weather apps as beginner projects, our example focuses on something simpler and more beginner-friendly the World Clock which teaches the same core concepts: search functionality, real-time updates, and clean front-end design.
Before we begin, let’s quickly check if you’re ready. If you’ve learned the basics of HTML, CSS, and a little bit of JavaScript, that’s more than enough. You don’t need to know any complex tools or systems. Even if you’ve never used something like Git before, don’t worry this guide is designed to be easy to follow, step by step, from start to finish.
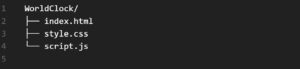
Prepare Your Website Project Folder
Before we jump into the code, let’s get our files ready. We’ll be working with just three simple files one for structure (HTML), one for styling (CSS), and one to make things interactive (JavaScript). Go ahead and create these files in a new folder. This will be your website’s starting point.
Most tutorials out there ask you to connect with outside services, use API keys, or work with tools like Git. But in this World Clock project, we’re keeping things refreshingly simple. There’s no need to create accounts, install anything, or rely on third-party code. Everything you build will run right in your browser using just basic HTML, CSS, and JavaScript. No external libraries, no Git setups just clean code that you’ll write and understand yourself.
You might’ve heard of GitHub it’s a popular platform where developers store and share their code online. It’s also used for tracking changes, working in teams, and backing up projects. While GitHub is helpful in big development workflows, we won’t be using it here. Since this World Clock project is focused on learning the basics, you’ll be building everything right on your computer without needing to upload anything to GitHub.
How to Build a Website from Scratch
Now it’s time to bring your website to life. This is the stage where everything we planned turns into real code. We’ll start building it step by step from the layout you see to the features that make it work. Bit by bit, your World Clock will come together, and by the end, you’ll have a complete site that runs right in your browser.
Our website is simple, with just a few basic features so there’s no need to use any complex tools or frameworks. We’re sticking to the basics: HTML, CSS, and JavaScript. That’s more than enough for what we’re building. Later, if you work on larger projects that need more structure or advanced features, you can explore tools like React or Angular. But for now, keeping it light makes learning easier.
Starting with the HTML Layout of Your Website
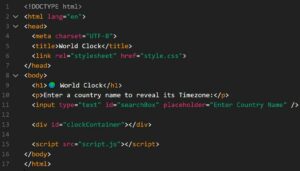
Let’s Look at What’s Inside the HTML File
This HTML file sets up the basic structure of our World Clock webpage. It includes a heading, a short message for the user, a text input field to enter any country name, and a container where the time details will appear. We’ve also linked the CSS and JavaScript files, which will handle the design and functionality we’ll cover those parts shortly.
Let’s Design Our Page with CSS
Now that our website’s basic layout is complete using HTML, it’s time to focus on how it looks. This is where CSS (Cascading Style Sheets) helps us. CSS is used to style the webpage it controls things like colors, text styles, spacing, and how everything is arranged on the screen. It doesn’t change the actual content, but it changes how that content appears to the user. In simple words, CSS makes your website look neat, beautiful, and user-friendly.
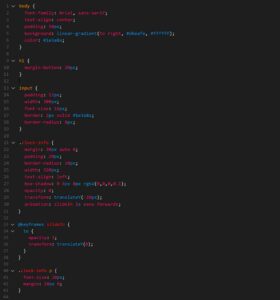
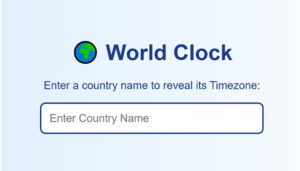
We styled our World Clock using simple and clean CSS. The page has a soft blue-to-white background, centered content, and a neat font for readability. The input box is user-friendly with rounded corners and enough padding. When a country is entered, a styled box appears showing the time, day, and date it slides in smoothly with a light animation. This box has a soft shadow, left-aligned text, and spacing that keeps everything clear and easy to read. Overall, the CSS keeps the design light, fresh, and beginner-focused.
Here’s what the World Clock looks like in the browser after applying the styling:
Once the layout is built with HTML and the styling is done with CSS, the final step is to make the website interactive and that’s exactly what JavaScript is for. HTML tells the browser what content to show, CSS decides how it looks, but JavaScript brings it all to life. It lets the website react to what users do, update information in real-time, and handle data on the spot.
In our World Clock example, JavaScript takes the country name typed by the user and shows the current time, date, and day for that country. It also keeps the clock ticking live, making our site feel dynamic and responsive instead of still and static.
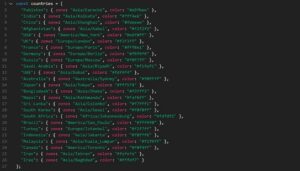
In this JavaScript code, we define a list of countries with their time zones and background colors. When a user enters a country name and presses Enter, the script checks for a match.
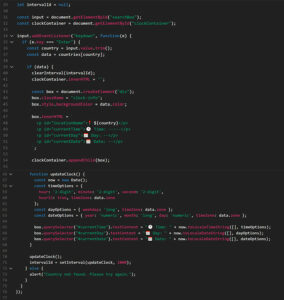
If found, it displays a styled box showing the current time, day, and date using JavaScript’s built-in toLocaleTimeString() and toLocaleDateString() methods. The data update every second through setInterval(). If the country isn’t recognized, an alert is shown. The entire functionality runs directly in the browser without any external APIs or libraries.
Final Website View in Browser
Now that everything’s set up, it’s a good time to try out the World Clock you’ve built. Enter country names like Pakistan, China, or Germany and see how the site responds. This step is essential in learning how to build a website from scratch,
because testing helps you understand how well your features perform in real-time, just like a user would experience them.
Watch the demo below to see how our World Clock website works in real-time.
It’s a clear example of how to build a website from scratch using just HTML, CSS, and JavaScript.
Invalid Search
Now let’s try checking if our site handles mistakes well type in something random or misspelled and see how it responds.
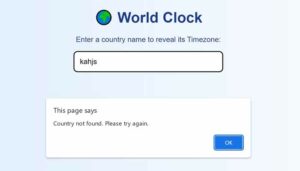
If the name you type doesn’t match any country we’ve added, the site will gently let you know it couldn’t find a match. This way, things stay simple and clear for everyone.
Our project is pretty small, so there’s not a long checklist to go through. But in real websites, it’s always a good idea to think about different ways people might use it and then make sure everything works just right in each case.
When you’re learning how to build a website from scratch, testing is just as important as writing the code. This part is known as functional testing it means checking if the main things like searching for a country, showing the correct time, or displaying a clear error message all work the way they should. It helps confirm that your site is doing exactly what you built it to do.
Besides checking the main features, there are other ways to test your website too. These help you understand how your site performs in different cases like if it opens quickly, looks good on phones or tablets, or handles slow internet without breaking.
Simple Site Testing Checklist
- Check Each Step SeparatelyMake sure every part of your site works on its own. For example, try typing in a country name to see if the input works as expected.
- Test How Everything ConnectsTry the full process from entering the country name to seeing the time and date appear. This shows if all parts are working together smoothly.
- Use the Site Like a Visitor Would
Pretend you’re someone using the site for the first time. Try correct names, wrong spellings, or random words. This helps find any small issues you might miss as the builder.
Once your website is ready and everything works just right, it’s time to show it to the world. You can upload your files to a platform like GitHub this acts like a storage space on the internet. From there, your site can be shared or even made live so anyone can access it from anywhere.
Uploading Your Website Code Online
Version control works like a safety net for your code. Every change you make is saved, just like bookmarking a moment in a game. If something breaks or doesn’t go as planned, you can quickly return to a working version. It’s also a big help when you’re working with others, making it easy to stay organized and avoid mistakes.
- If your code stops working or runs into a problem, version control lets you roll back to an earlier version where everything was fine.
- By uploading your project to GitHub, your work stays secure and backed up no worries about losing any progress.
Branches help you test out new ideas without breaking your main project. Think of it as working on a separate notebook page you can scribble, experiment, and if it works, you add it to the final version. It’s super helpful when more than one person is coding, so everyone can do their part without stepping on each other’s toes.
When you’re ready to take your website live, platforms like Netlify step in to make it simple. They connect effortlessly with GitHub, so every time you make changes to your project, your site updates like magic no extra steps needed.
Before we upload your project to GitHub, take a moment to check the instructions you got when creating the repository. It’s important to run the right commands so your project connects smoothly. Once that’s done, you’ll be ready to move forward with sharing your code online.
Publishing Your Website
Before getting into the final steps, it’s important to understand what deployment and hosting actually mean especially if you’re learning how to build a website from scratch. Deployment is the process of making your website live on the internet, while hosting is the place where your website’s files are stored so people can access it anytime from anywhere.
Deployment simply means putting your website online so people can visit it. Once your code is ready, you need to upload it somewhere on the internet and that’s where hosting comes in.
Hosting is like giving your website a home on the internet. Just like a house has an address, your website also gets a web address (URL) so anyone can find it using their browser.
Together, deployment and hosting make sure your website is not just sitting on your computer it’s out there for the world to see.
Learning how to build a website from scratch and taking it live online is like turning a simple idea into something real and useful.
As you move through each stage, you pick up hands-on coding skills and learn to manage your project in a clean, organized way. And when your site finally goes live for the world to see, the sense of achievement is truly something special.
This guide on How to Build a Website from Scratch used our World Clock project to explain the basics. While this was a simple example, real-world projects often involve teamwork, performance tuning, and strong security measures.
With every step you take in learning, you’ll encounter new hurdles and exciting ways to upgrade your site’s features and usability. Welcome the process, and take pride in watching your ideas turn into a live website. If you’re on a journey to understand how to build a website from scratch, happy building and enjoy every moment of coding!
Improve your website building skills and for more support, visit EmbossItWorld.com.

Add comment